Simple Example to show Grid in Angular Application using Angular Material
Grid on the Web page is used to display the data in the Tabular form, on the grid we can show huge data in Columns & Rows, here in this example we are using Angular Material to show the Grid on the Angular Web Page, follow the below steps to show the Angular Material Grid on the Web Page:
Step 1: Create Angular application using below command:
ng new AngularMaterialGridExample
The above command will create Angular application with the Application name as "AngularMaterialGridExample", it will create a directory with Project name and add the required Angular files and folders in that Project directory.
Step 2: Now, route to the project directory and open the code in Angular Code Editor, here in this example we will be using Visual Studio Code editor to open the Angular code
cd AngularMaterialGridExample
code .
Step 3: Install the Angular Material Package to use the Grid Table using below command:
ng add @angular/material
The above command will install latest version of Angular Material package, it will add the Angular Material dependencies in package.json file and also it will create the "material" folder in node_modules/@angular folder.
Step 4: Add the MatTableModule in the imports of app.module.ts file as shown below:
- import { NgModule } from '@angular/core';
- import { BrowserModule } from '@angular/platform-browser';
- import { AppComponent } from './app.component';
- import { BrowserAnimationsModule } from '@angular/platform-browser/animations';
- import {MatTableModule} from '@angular/material/table';
- @NgModule({
- declarations: [
- AppComponent
- ],
- imports: [
- BrowserModule,
- BrowserAnimationsModule,
- MatTableModule,
- ],
- providers: [],
- bootstrap: [AppComponent]
- })
- export class AppModule { }
We have imported the module called MatTableModule from '@angular/material/table' library and also have added MatTableModule in the imports section of app.module.ts file so that we can use the Angular Material's Table Layout in our Component page.
Step 5: Add the below code in app.component.ts to set the data to show on the Angular Material Grid Component:
- import { Component } from '@angular/core';
- export interface StudentModel {
- Student_RollNo: number;
- Student_Name: string;
- Student_Marks: number;
}
- const Student_Details: StudentModel[] = [
- {Student_RollNo: 1, Student_Name: 'John', Student_Marks: 85},
- {Student_RollNo: 2, Student_Name: 'William', Student_Marks: 95},
- {Student_RollNo: 3, Student_Name: 'Bob', Student_Marks: 80},
- {Student_RollNo: 4, Student_Name: 'Sunny', Student_Marks: 90},
- {Student_RollNo: 5, Student_Name: 'Richard', Student_Marks: 100},
- ];
- @Component({
- selector: 'app-root',
- templateUrl: './app.component.html',
- styleUrls: ['./app.component.css']
- })
- export class AppComponent {
- title = 'AngularMaterialGridExample';
- columnNames: string[] = ['Student_RollNo', 'Student_Name', 'Student_Marks'];
- studentDetailsGridDataSource = Student_Details;
- }
As shown above, we have declared Student_Details as an Array of StudentModel and have set the data to Student_Details property, we have declared Column Name to be shown in the table as "Student_RollNo", "Student_Name" and "Student_Marks".
Step 6: Add the below code in app.component.html template file to show the Data in table grid:
- <table mat-table [dataSource]="studentDetailsGridDataSource" class="mat-elevation-z8" style="margin:20px;width:500px;">
- <ng-container matColumnDef="Student_RollNo">
- <th mat-header-cell *matHeaderCellDef> Roll No. </th>
- <td mat-cell *matCellDef="let element"> {{element.Student_RollNo}} </td>
- </ng-container>
- <ng-container matColumnDef="Student_Name">
- <th mat-header-cell *matHeaderCellDef> Name </th>
- <td mat-cell *matCellDef="let element"> {{element.Student_Name}} </td>
- </ng-container>
- <ng-container matColumnDef="Student_Marks">
- <th mat-header-cell *matHeaderCellDef> Marks </th>
- <td mat-cell *matCellDef="let element"> {{element.Student_Marks}} </td>
- </ng-container>
- <tr mat-header-row *matHeaderRowDef="columnNames"></tr>
- <tr mat-row *matRowDef="let row; columns: columnNames;"></tr>
- </table>
As per the declaration made in the app.component.ts, we have used the same names here in app.component.html file, so that it will show the data properly, to make the table display as AngularMaterial table, we have added following:
1. Added "mat-table" as a property to table element to show the table using AngularMaterial
2. Added "mat-header-cell" as a property to th element to show Column header
3. Added "mat-cell" as a property to td element to show the Column Data which we have set in the Component page.
Step 7: Now, run the application using below command:
ng serve -o
The above command will show the output as shown below:
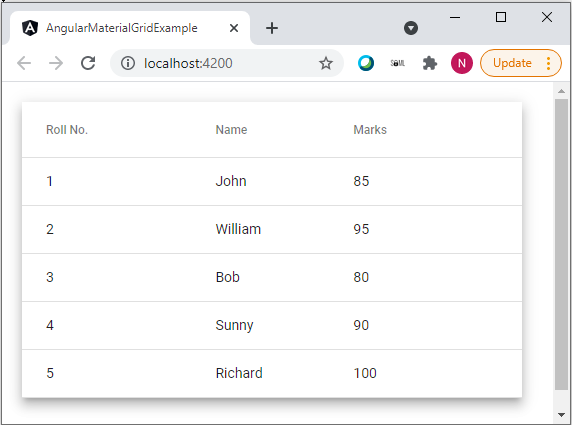
As per above output, it has displayed the table containing Student_Details using Angular Material design. We have used MatTableModule of Angular Material to display the table.